JS / Qiskit projects
Build interactive, visual quantum projects in JavaScript: the Qiskit API in the browser, your own HTML and CSS for output, and Python files when you want them.
In a JS / Qiskit project, you write JavaScript that calls the Qiskit API, and you render the results into your own HTML and CSS. The project runs entirely in the browser, in a sandboxed iframe, which means it has no browser storage and keeps nothing between runs; see Saving data between runs. Build one when you want a widget, an animation, or a custom chart rather than plain text output. For standard, textual quantum work, use Python / Qiskit instead.
The files
A project with index.html and main.js at the top level runs as a JS project. The runtime environment explains how the files decide. index.html and the optional main.css define the page your results are drawn on, and main.js runs the circuit and updates that page. The page appears above the console when you run the project.
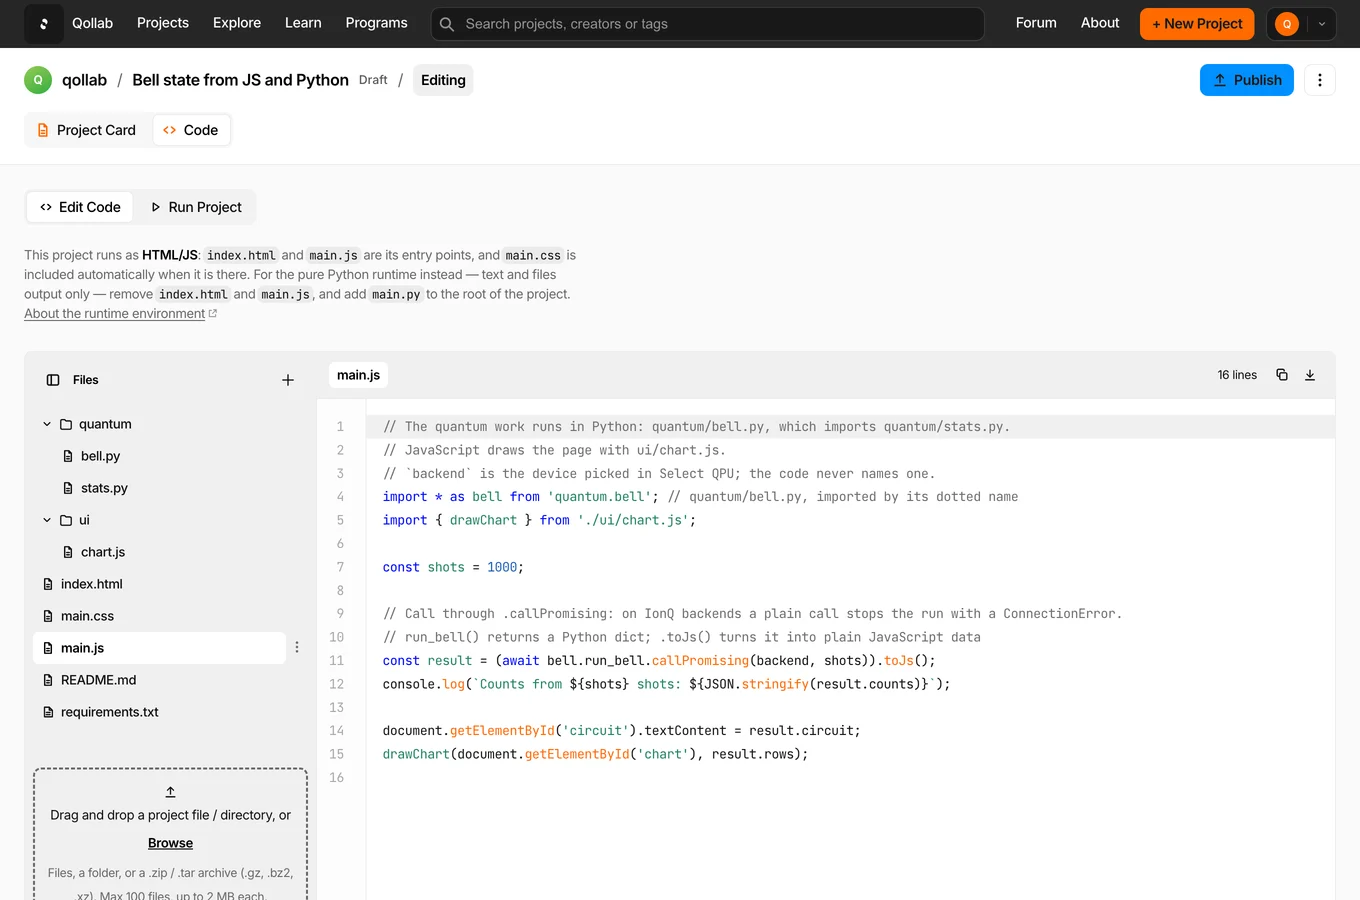
main.js can import your other JavaScript files with ./ paths, and your Python files by their dotted module name, so the quantum work can live in Python while JavaScript draws the page:
import * as bell from 'quantum.bell';   // your quantum/bell.py

const counts = (await bell.run_bell.callPromising(backend, 1000)).toJs();
Call the functions in your own Python files through .callPromising, as above, or .callPromisingKwargs when you pass keyword arguments. On IonQ backends, a plain call such as bell.run_bell(backend, 1000) stops the run with a ConnectionError that says XHR is not supported.
Use named imports or import * as; a default import of a Python module gives undefined. Importing your own files has the details.
The API
The API is the Python Qiskit 2.x API made available to JavaScript, so it looks close to Python, with a few conventions:
- Import from
qiskit. For exampleimport { QuantumCircuit } from 'qiskit', orimport { JobStatus } from 'qiskit.providers.jobstatus'. - No
new. Create objects by calling the constructor directly, just like Python:const circuit = QuantumCircuit(2, 2). Methods match Qiskit too, such ascircuit.h(0)andcircuit.measure([0, 1], [0, 1]). - Named arguments use
.callKwargs. Where Python takes keyword arguments, pass them as a trailing object throughcallKwargs:circuit.draw.callKwargs({ output: 'mpl' }). - Unpack Python values with
.toJs(). Return values arrive as proxies to Python objects. Call.toJs()to use one as plain JavaScript data, for exampleresult.get_counts().toJs(). backendis pre-created, and running is async. Submit withconst job = await backend.run(circuit, { shots: 100 }). The code runs in an async context, so top-levelawaitworks, and the injectedsetTimeoutreturns a promise you can await while pollingjob.status()againstJobStatus.DONEandJobStatus.ERROR.
A minimal example
import { QuantumCircuit } from 'qiskit';

// No `new`: call the constructor like the Python API
const circuit = QuantumCircuit(2, 2);
circuit.h(0);
circuit.cx(0, 1);
circuit.measure([0, 1], [0, 1]);

// `backend` is pre-created; run() is async and returns a job
const job = await backend.run(circuit, { shots: 100 });

// Python objects come back as proxies; .toJs() unpacks them
const counts = (await job.result()).get_counts().toJs();

// Render into the HTML you defined
document.getElementById('legend').textContent = JSON.stringify(counts);
Waiting for user input
A run ends when the top level of main.js finishes, awaits included. The console prints Done., and the project no longer shows as running. Your page and its event handlers keep working after that, but IonQ circuits run only while the run is going, so on IonQ a backend.run from a click handler after Done. fails with an error saying the run has finished. The local simulators still run it, with a warning in the console, since the person running your project might pick IonQ instead.
To run the circuit when the user asks for it, keep main.js waiting: await a promise that the handler resolves once the results are in.
const button = document.getElementById('go');
const shots = document.getElementById('shots'); // <input type="number">

// main.js stays here, and the run stays live, until the click has run the circuit
await new Promise((resolve, reject) => {
  button.addEventListener('click', async () => {
    button.disabled = true;
    try {
      const job = await backend.run(circuit, { shots: Number(shots.value) });
      const counts = (await job.result()).get_counts().toJs();
      document.getElementById('legend').textContent = JSON.stringify(counts);
      resolve();
    } catch (err) {
      reject(err);
    }
  }, { once: true });
});
The handler runs once because an IonQ run takes one job; press Run again for the next one. The same applies when the work lives in a function: write await main(), not main().catch(...) or void init(), or the top level finishes before the job is sent.
Drawing circuits
circuit.draw.callKwargs({ output: 'mpl' }) returns a Matplotlib figure. The call needs Qiskit Visualizations turned on first, in the Libraries list. Pass the figure to URL.createObjectURL(figure) to get a URL you can drop into an <img>; the runtime turns the figure into an SVG.
Related
Stay in the loop.
Get the latest tutorials, demos, and project showcases straight to your inbox. No noise, just the good stuff.
Enable JavaScript to sign up.
Qollab updates only. Unsubscribe any time. Privacy Policy.
Running code