Your first circuit
One qubit, one gate, one measurement: build a circuit, run it on the IonQ simulator from your browser, and read the tally that comes back.

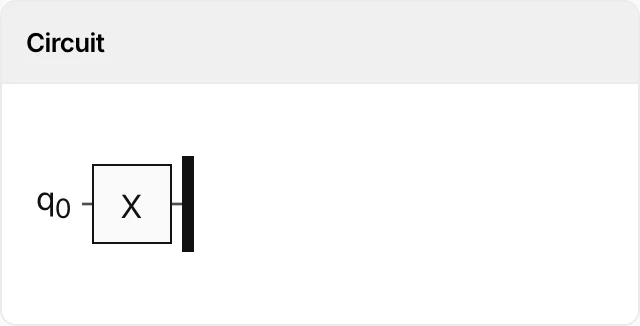
A quantum circuit is a program with an unusual kind of output. Instead of a value, a circuit returns a tally: how many times each possible answer came up when the circuit was run over and over.
This lesson builds one, runs it on a simulator of IonQ's Aria 1 machine from your browser, reads the tally, then changes the circuit once and the printout twice. Nothing to install. Running it needs a free account; signing in with Google or GitHub takes a minute and is the first step of the run.
What a circuit is
An ordinary program moves bits through logic gates and prints the result. A quantum circuit moves qubits through quantum gates, then measures them, and the measurement is what produces a bit you can print.
A qubit starts every run at 0. Gates change it, in order. A measurement reads it and copies the answer, 0 or 1, into an ordinary bit, and the bits are what come back to you. In code, those are four words:
The qubit
The thing the gates act on. It starts at 0 on every run. In code it is a position number, qubit 0, and the ordinary bit that stores what was read of it is a second position number, bit 0.
The X gate
The flip. A qubit that reads 0 comes out reading 1, and the other way round. It is the quantum version of NOT, and the only gate in this lesson.
Measurement
Reads a qubit and writes the answer, 0 or 1, into an ordinary bit. In this circuit it is the last step. Everything a run hands back to you comes through a measurement.
Shots
How many times the whole circuit is executed, start to finish, in one press of Run. One shot gives one answer. A thousand shots give a tally, and the tally is what a quantum program actually returns.
The circuit, then the code
A circuit is drawn like a timeline. The single line is the qubit; the doubled line under it is the ordinary bit. Each box on the qubit's line is a gate acting on it, in order. The meter at the end is the measurement, and its arrow points at the bit the answer lands in.
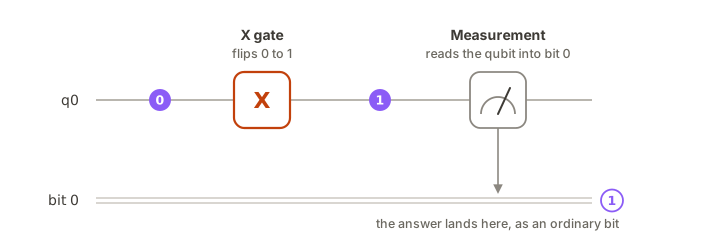
In Qiskit, the Python library this course uses, that picture is three lines:
qc = QuantumCircuit(1, 1)   # one qubit, one ordinary bit
qc.x(0)                     # the X gate on qubit 0
qc.measure(0, 0)            # read qubit 0 into bit 0
Everything else in the listing below is plumbing: send the circuit to a machine, wait for it, read the tally, print it. One name in that plumbing is not defined anywhere in the file: backend.
The Playground creates backend before your code runs. It holds whatever you choose when you press Run: a simulator in your browser, a model of an IonQ machine on IonQ's cloud, or the machine itself. Same code for all three.
# 'backend' already exists when this runs: it is whatever you pick in the Run Experiment dialog.
from qiskit import QuantumCircuit
from qiskit.providers.jobstatus import JobStatus
import time
shots = 1000
1qc = QuantumCircuit(1, 1)
2qc.x(0)
3qc.measure(0, 0)
print(qc)
4job = backend.run(qc, shots=shots)
while job.status() not in (JobStatus.DONE, JobStatus.ERROR, JobStatus.CANCELLED):
5 time.sleep(5)
6counts = job.result().get_counts()
print(counts)
for bits, n in sorted(counts.items()):
print(f"{bits}: {n:4d} {'█' * (50 * n // shots)}")
- 1one qubit to compute with, one classical bit to hold what we read
- 2the X gate flips qubit 0 from 0 to 1
- 3read qubit 0 and store the answer in bit 0
- 4one job, the circuit run 1,000 times
- 5the simulator runs on IonQ's cloud, so we wait for it
- 6a dict: each bitstring, and how many shots read it
Run the circuit, from nothing to a tally
Before you press anything, make a prediction. The circuit executes 1,000 times, 1,000 shots. How many of those shots will read 1? Write the number down. You will check it against the console in a minute.
- Sign in with Google or GitHub. That creates your account; Qollab then asks for a username and your name, and nothing else.
- Open the project. The code above is already in it, under the Code tab.
- Press Run on Qollab, top right.

- The Run Experiment dialog opens and asks which compute instance to launch the project in. Under Remotely Run Simulators, choose IonQ Aria 1: a free simulator with a noise model of Aria 1, a machine IonQ has since retired. Press Run.
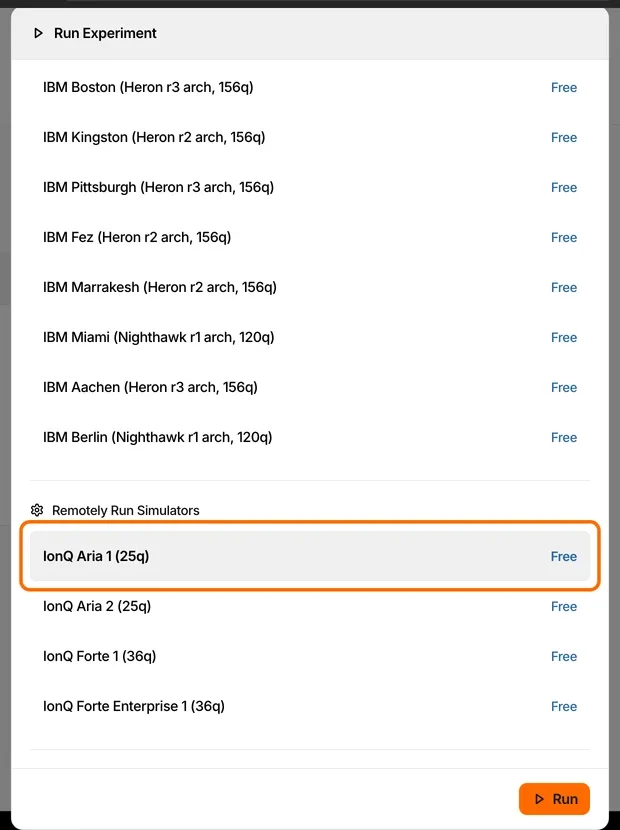
- Wait. The job is queued on IonQ's cloud, and the
whileloop in the code checks on it every five seconds until it is done, or has failed. Ours took under twenty seconds.
What came back
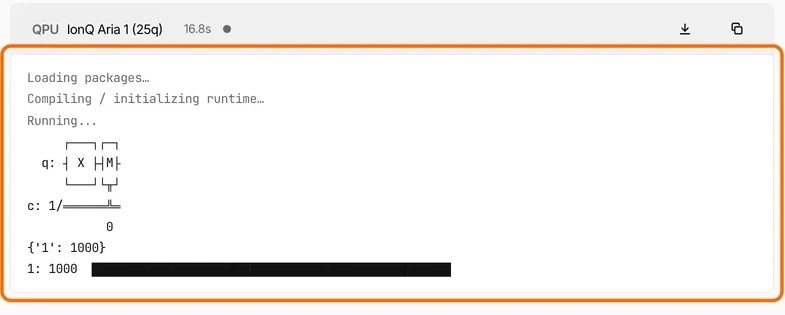
Compare the tally with your prediction. We pressed Run twice on 15 September 2026, on the Aria 1 noise model. The first time, 999 shots read 1 and one read 0: {'0': 1, '1': 999}, which the Probabilities panel showed as 99.90% and 0.10%. The second time, all 1,000 read 1.
The ideal answer is 1 on every shot, and if you predicted 1,000 you were right about the circuit. The stray 0 in the first press is the noise model at work.
A noise model is IonQ's simulator with an error model set to one of its machines, Aria 1 here; IonQ describes the models as representative of the named system.
So a circuit with a certain answer can still come back with a tail, the few shots that read the other answer. Lesson 6 measures tails like this at 4,000 shots.
Why the qubit reads 1
A qubit starts at 0. The X gate maps 0 to 1, so after it the qubit is exactly 1, not probably 1. Measuring a qubit that is exactly 1 gives 1 every time. Nothing in this circuit is uncertain. Lesson 2 builds one that is.
Gates compose. Two X gates in a row map 0 to 1 and then back to 0, so the answer depends on the whole sequence, not on any one gate.
Make it yours: fork the project
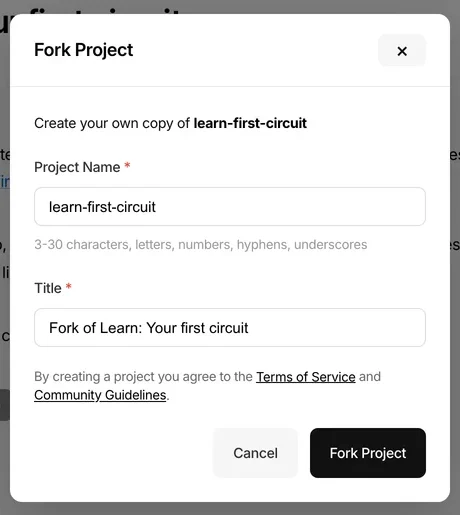
On someone else's project the code is read-only. To change it you fork it: press Fork at the top right, keep the name the dialog suggests, and press Fork Project.
You land on your own copy, marked Draft, with the code editable under its Code tab. Run on Qollab works there exactly as before. Every edit is saved to your copy; the original stays as it was.
Assignment: make every shot read 0 without deleting a line
The circuit reads 1 on every shot. Your job is to make it read 0 on every shot, by adding to the circuit rather than removing from it.
- In your fork, keep
qc.x(0)exactly where it is. Nothing gets deleted. - Work out what a second X gate would do. The gate flips whatever it finds: a qubit at
0comes out at1, and a qubit at1comes out at0, with no memory of what came before. - Add the line that follows from that.
- Write down the tally you expect, then press Run.
Solution
Two X gates in a row. The second undoes the first, so the qubit is back at 0 when it is measured.
qc.x(0)
qc.x(0)
qc.measure(0, 0)
When you print(qc) you see two boxes on the wire. The tally is all 0, or all 0 but a few stray 1s: the noise model's tail is still there, now on the other side.
Reading a tally
The counts dict is the whole result; the bars are only a picture of it, and the picture drops small tails. Each bar is scaled to fifty characters for the full shot count, so ten shots in a thousand draw as no bar at all.
A share, written as a percentage, survives any shot count. It is also what lets you compare a run of 1,000 with a run of 10,000. The Probabilities panel already shows shares, but the console is what Copy output and Download give you, and the console does not.
Assignment: print the tail as a percentage
- Find the last
print, in the bar loop. It already has both numbers you need:n, how many shots read this bitstring, andshots, the total. - The share is
n / shots, times 100. Put that arithmetic inside the f-string's curly braces, where Python evaluates it, with the format spec:.1ffor one decimal place, the same way:4dformatsn. - Run, and check that the shares next to the bars add up to 100.
Solution
One expression added to the existing line:
for bits, n in sorted(counts.items()):
    print(f"{bits}: {n:4d}  {100 * n / shots:5.1f}%  {'█' * (50 * n // shots)}")
5.1f makes the number five characters wide with one decimal, so the columns line up. A tail of 7 shots in 1,000 prints as 0.7%.
The dict is the result
Every later lesson pulls numbers out of counts in code rather than reading them off the bars. The dict maps each bitstring that was read to how many shots read it, and only the bitstrings that were read: our second press had no '0' key at all.
So counts['0'] would have crashed on that press. counts.get('0', 0) returns 0 instead when the key is missing, which is the form to use.
Assignment: pull one number out of the dict
- After the bar loop, add one line that prints the share of shots that read
1as a number between 0 and 1: the count for the key'1', divided byshots. - Write it with
counts.get('1', 0)rather thancounts['1']. Your fork still has two X gates, so its tally has no'1'key at all, andcounts['1']would crash on it. - Run. The line prints
0.0, or a hair above it if the noise model gave you a stray1. - Check the line by hand against the public project's two tallies:
{'1': 1000}gives1.0and{'0': 1, '1': 999}gives0.999.
Solution
print(counts.get('1', 0) / shots)
On your two-X fork this prints 0.0; on the public project's two presses it would print 1.0 and 0.999. Lesson 4 uses exactly this line to compare a measured share with the value a rotation gate should give.
How many shots is enough
A tally is a sample, and a sample is an estimate. The noise model did not change between our two runs; the second sample was small for such a rare event and missed it. More shots sharpen the estimate. They never change what the circuit does.
This gate gave a certain answer. Lesson 2's gate, the Hadamard, gives an uncertain one, and the tally of many runs is the only way to read it.
Stay in the loop.
Get the latest tutorials, demos, and project showcases straight to your inbox. No noise, just the good stuff.
On this page
- 1What a circuit is
- 2The circuit, then the code
- 3Run the circuit, from nothing to a tally
- 4What came back
- 5Why the qubit reads 1
- 6Make it yours: fork the project
- 7Assignment: make every shot read 0 without deleting a line
- 8Reading a tally
- 9Assignment: print the tail as a percentage
- 10The dict is the result
- 11Assignment: pull one number out of the dict
- 12How many shots is enough